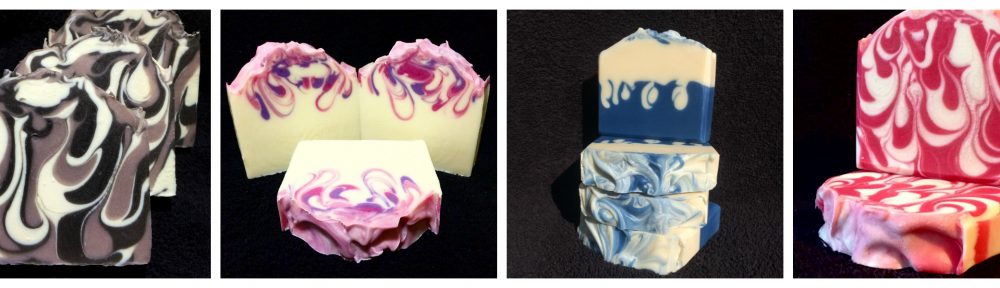

Tutti Frutti
There’s been a lot of interest in my rainbow drop swirl (Tutti Frutti) soap recently, so I thought I’d put together a little pictorial tutorial for anyone who’s interested in how it’s done (I really, REALLY should start making videos shouldn’t I?).
Many of you will already know how big a fan I am of the drop swirl technique. Almost all of my core range is made using either a full or partial drop swirl, and Tutti Frutti is no exception. I made another couple of batches recently, and took some photographs along the way…
**Please make sure you’re familiar with the basics of soapmaking before you try any advanced swirls (Soap Queen is a good place to start) and always wear protective clothing / gloves / goggles. Safety first!!**
I generally make soap at room temperature, so I’ll mix up the lye solution in advance and put it to one side to cool down (I don’t discount the water for this one). I’ll also melt the hard oils and butters and combine them with the liquid oils and butters and allow them to cool down to room temp.
Next I measure out the seven different micas straight into the pouring jugs (actually here you’ll see six different micas and one liquid colourant. It’s notoriously difficult to get a good red in CP soap, but I use a liquid colour from Gracefruit which is rather good. They appear to be out of stock of the red at the moment, but hopefully it’ll be back in soon.)
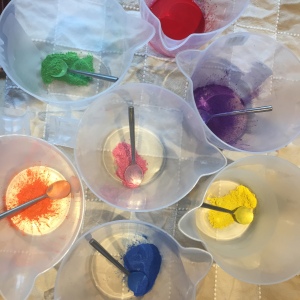
colourants ready for mixing into the soap batter
Next I add my fragrance oil to the room temp oils and butters. Many people add their fragrance AFTER adding the lye and tracing the soap, but my preference is to add it before.
I then add a couple of teaspoons of the fragranced oils to each jug of mica and get them well blended. I know it’s common practice to skip this stage and simply add the traced lye batter directly onto the powdered mica (or add the powdered mica directly to jugs of traced batter), but I don’t always use a stick blender and this way I know I can get the colour incorporated well just by giving it a good mix with a spatula.

Pre-mixed colourants, oils and a jug of lye water
I get my moulds ready – notice my high-tech method of stopping the mould sides from bowing inwards 😀

Moulds prepared…
And then we’re ready to go… I mix the lye water into the tub of (already fragranced!) oils and butters, and share the soap batter out equally into the seven prepared jugs. It would appear I forgot to get a photo of that stage – sorry! What we’re looking for is a really light trace as the soap will thicken up during the pouring process. Personally I don’t stick-blend this soap AT ALL. I find that by the time I’ve mixed up all the colours thoroughly it’s already at a light trace, but this will very much depend on how quickly your particular soap recipe traces and which fragrance you’re using. I’ve even found that certain micas can inhibit trace, so there are many different factors involved. It’s a case of using your judgement and, to be honest, trial and error.
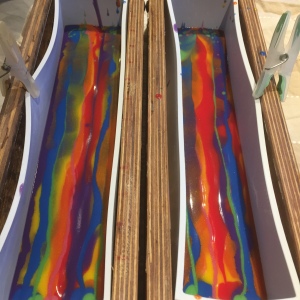
Next comes the pour. First in this time was yellow:

First pour – yellow
What’s crucial for a nice drop is the height from which you pour the soap in to the mould. At the early stages my jug is quite close to the bottom of the mould as I pour a line of soap along the length of it. Here’s the next couple of pours:

Red and orange poured next
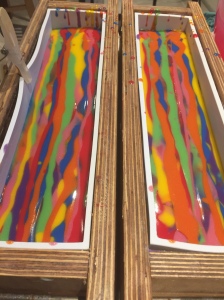
Once the bottom of the mould has been covered with soap, I start to raise the jugs a little higher as I pour, so that the soap drops into the previous layer, rather than sit on the top of it. It’s very hard to give a precise height as it very much depends on how thick your soap batter is (the thicker it is, the higher you’ll need to drop it from)
More colours poured
I try to make sure I pour from the jugs in the same order on each round of pouring, and also try to make sure I’m not pouring a colour on top of the same colour in the mould.
I keep pouring until the moulds are full:
Filling up the mould

Almost full…

Full!
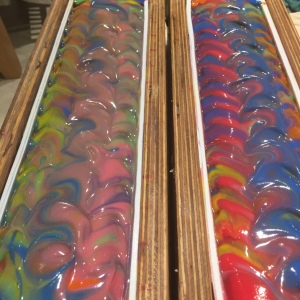
By this stage the batter is quite a bit thicker than when I started to pour, and looks none too tidy, but it doesn’t really matter once I start adding texture to the top:
Starting to tidy up the top
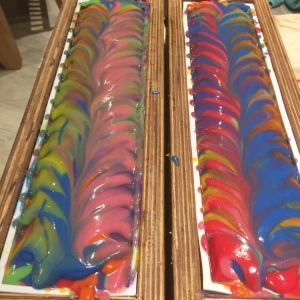
And the finished item:
Tutti Frutti in the mould
I generally leave soap in the mould for 48 hours before I unmould and cut:

Rainbow Drop Swirl mid-cut
And that’s it. It’s cured for 4 weeks, bevelled and tidied up, cured for another 2 weeks then released for sale.
Some time ago I started using the Instagram hashtag #dropsaretops for some of my photos – please use the tag to share your own drop swirls and make this drop swirl junkie very happy 😀

So beautiful and vibrant! I love it! Thanks for sharing your technique. My drop swirls are never as pretty as yours!
Thank you, you’re very welcome 😀
Wow, I wondered how you made these soaps just the other day 🙂. I’ve not made soap, well I’ve done one batch but it lost its scent as I used essential oils…not enough tho….but this looks like fun. Yes, vids are the way ahead I hear, look fwd to seeing one.
Ahhh thank you! Videos are definitely the way forward, I just need to buy the gear and get the set up sorted!
As somebody else said, my drop swirls are never as good as yours! I can’t wait to see your videos – when you finally get to make them!
Ahhh thank you so much (I’m starting to feel the pressure now!! 😂😂😂)
Pingback: The Week in Soap: 23rd April ’17 – A rainbow, a birthday and a rather good read | The Soap Mine
We have soaping technique in common! After fast tracing, instant tracing and ricing, and the many rebatches that ensued, we finally decided to mix in the scents and colorants before the lye! My soaping life had never been better! I don’t use micas but I do have some gold glitter I think I am going to make a special soap with because I want a fun colored soap. using the plant materials doesn’t give the same color pop like your tutti frutti.
Woop! It works well doesn’t it? Looking forward to seeing what you do with the glitter 😊
Terrific tutorial. Thanjs do much!
You’re welcome 😊
Oh wow, this looks amazing! I absolutely love the bright colours you’ve used, how fun and creative. 🙂 #MakeItLinky
Thanks so much Natalie!
Huh! I never heard of adding your fragrance oils before your lye solution. I will certainly have to give that a go! I usually add my fragrance oils to the castor oil+100g of my melted oils/fats/butters (so altogether about 300g and fragrance oils), then once I’ve the lye solution in and mixed a little, I add in the fragrance oil solution which reduces trace considerably. I love learning new soaping methods!
And I shall be trying it your way! Every day’s a school day 😉
I’ll be trying yours out hopefully by the end of next week, we shall compare notes!
This is so bright and cheerful. Maybe one day I’ll try to make some with the girls at the moment they’d try eating it! #MakeItLinky
This is so clever, and so very beautiful! Your tutorial is fab, but I think I’ll leave it to the experts! It’s really interesting to see how you do it though. #MakeItLinky
Thank you so much 😊
I’ve always wanted to make my own soap! Fantastic tutorial! Thank you! #MakeItLinky
Thanks for popping by! Give it a go – it’s lots of fun and handmade soap is SO lovely to use.
Beautiful Drop Swirl Soaps!!
Sly
Thank you 😀
Just to make sure I fully understand, the drop swirls are made by pouring the colors in lines, but not actually using something to swirl the soap after all is poured?
That’s right, no swirling at all once the soap is poured.
Your soap is really beautiful! I’m a newbe soaper and want to try making soap this way.
Thank you, and have fun, it’s addictive 😄